DEEPSOUND R5 Product Manual
- Hardware Version: v1.0.0
- Manual Version: v1.0
- Release Date: 2026-04-30
- Last Updated: 2026-04-30
- Author: SEONGSANLAB Co., Ltd.
PART I: Safety and Maintenance
1.1 Safety Information
- DEEPSOUND R5 is a high-performance remote-controlled PAUT device optimized for automated inspections and laboratory environments.
- As this device is controlled via an external PC and network, always check the connection status of the power supply and data communication cables.
- Due to the device’s slim design, ensure sufficient space around it for internal heat dissipation and do not block the ventilation openings.
- Using power sources other than the dedicated power adapter may damage internal precision circuits.
- Do not forcibly disconnect PAUT/UT connectors while the device is in operation.
1.2 Maintenance of the Device
- Operating Environment: Recommended range is 0°C to 60°C. Avoid high temperature and high humidity environments.
- Storage Environment: Store in an environment between -20°C and 80°C. Install on a flat surface with low vibration.
- For network security, avoid connecting to unauthorized network environments.
- Regularly check the pin status of input/output ports for bending or the presence of foreign objects.
1.3 Cleaning Guide
- Case Cleaning: Wipe the external aluminum/plastic case with a soft dry cloth.
- Port Management: To prevent dust accumulation in PAUT high-density connectors and BNC ports, store them with dedicated caps when not in use.
PART II: Product Overview
2.1 Introduction to DEEPSOUND R5
- DEEPSOUND R5 is a remote-controlled (Remote/Rack) unit that provides powerful 32:128PR Phased Array performance.
- With a compact, display-less design, it performs real-time data acquisition and analysis through PC software and is easy to integrate with automated scanner systems.
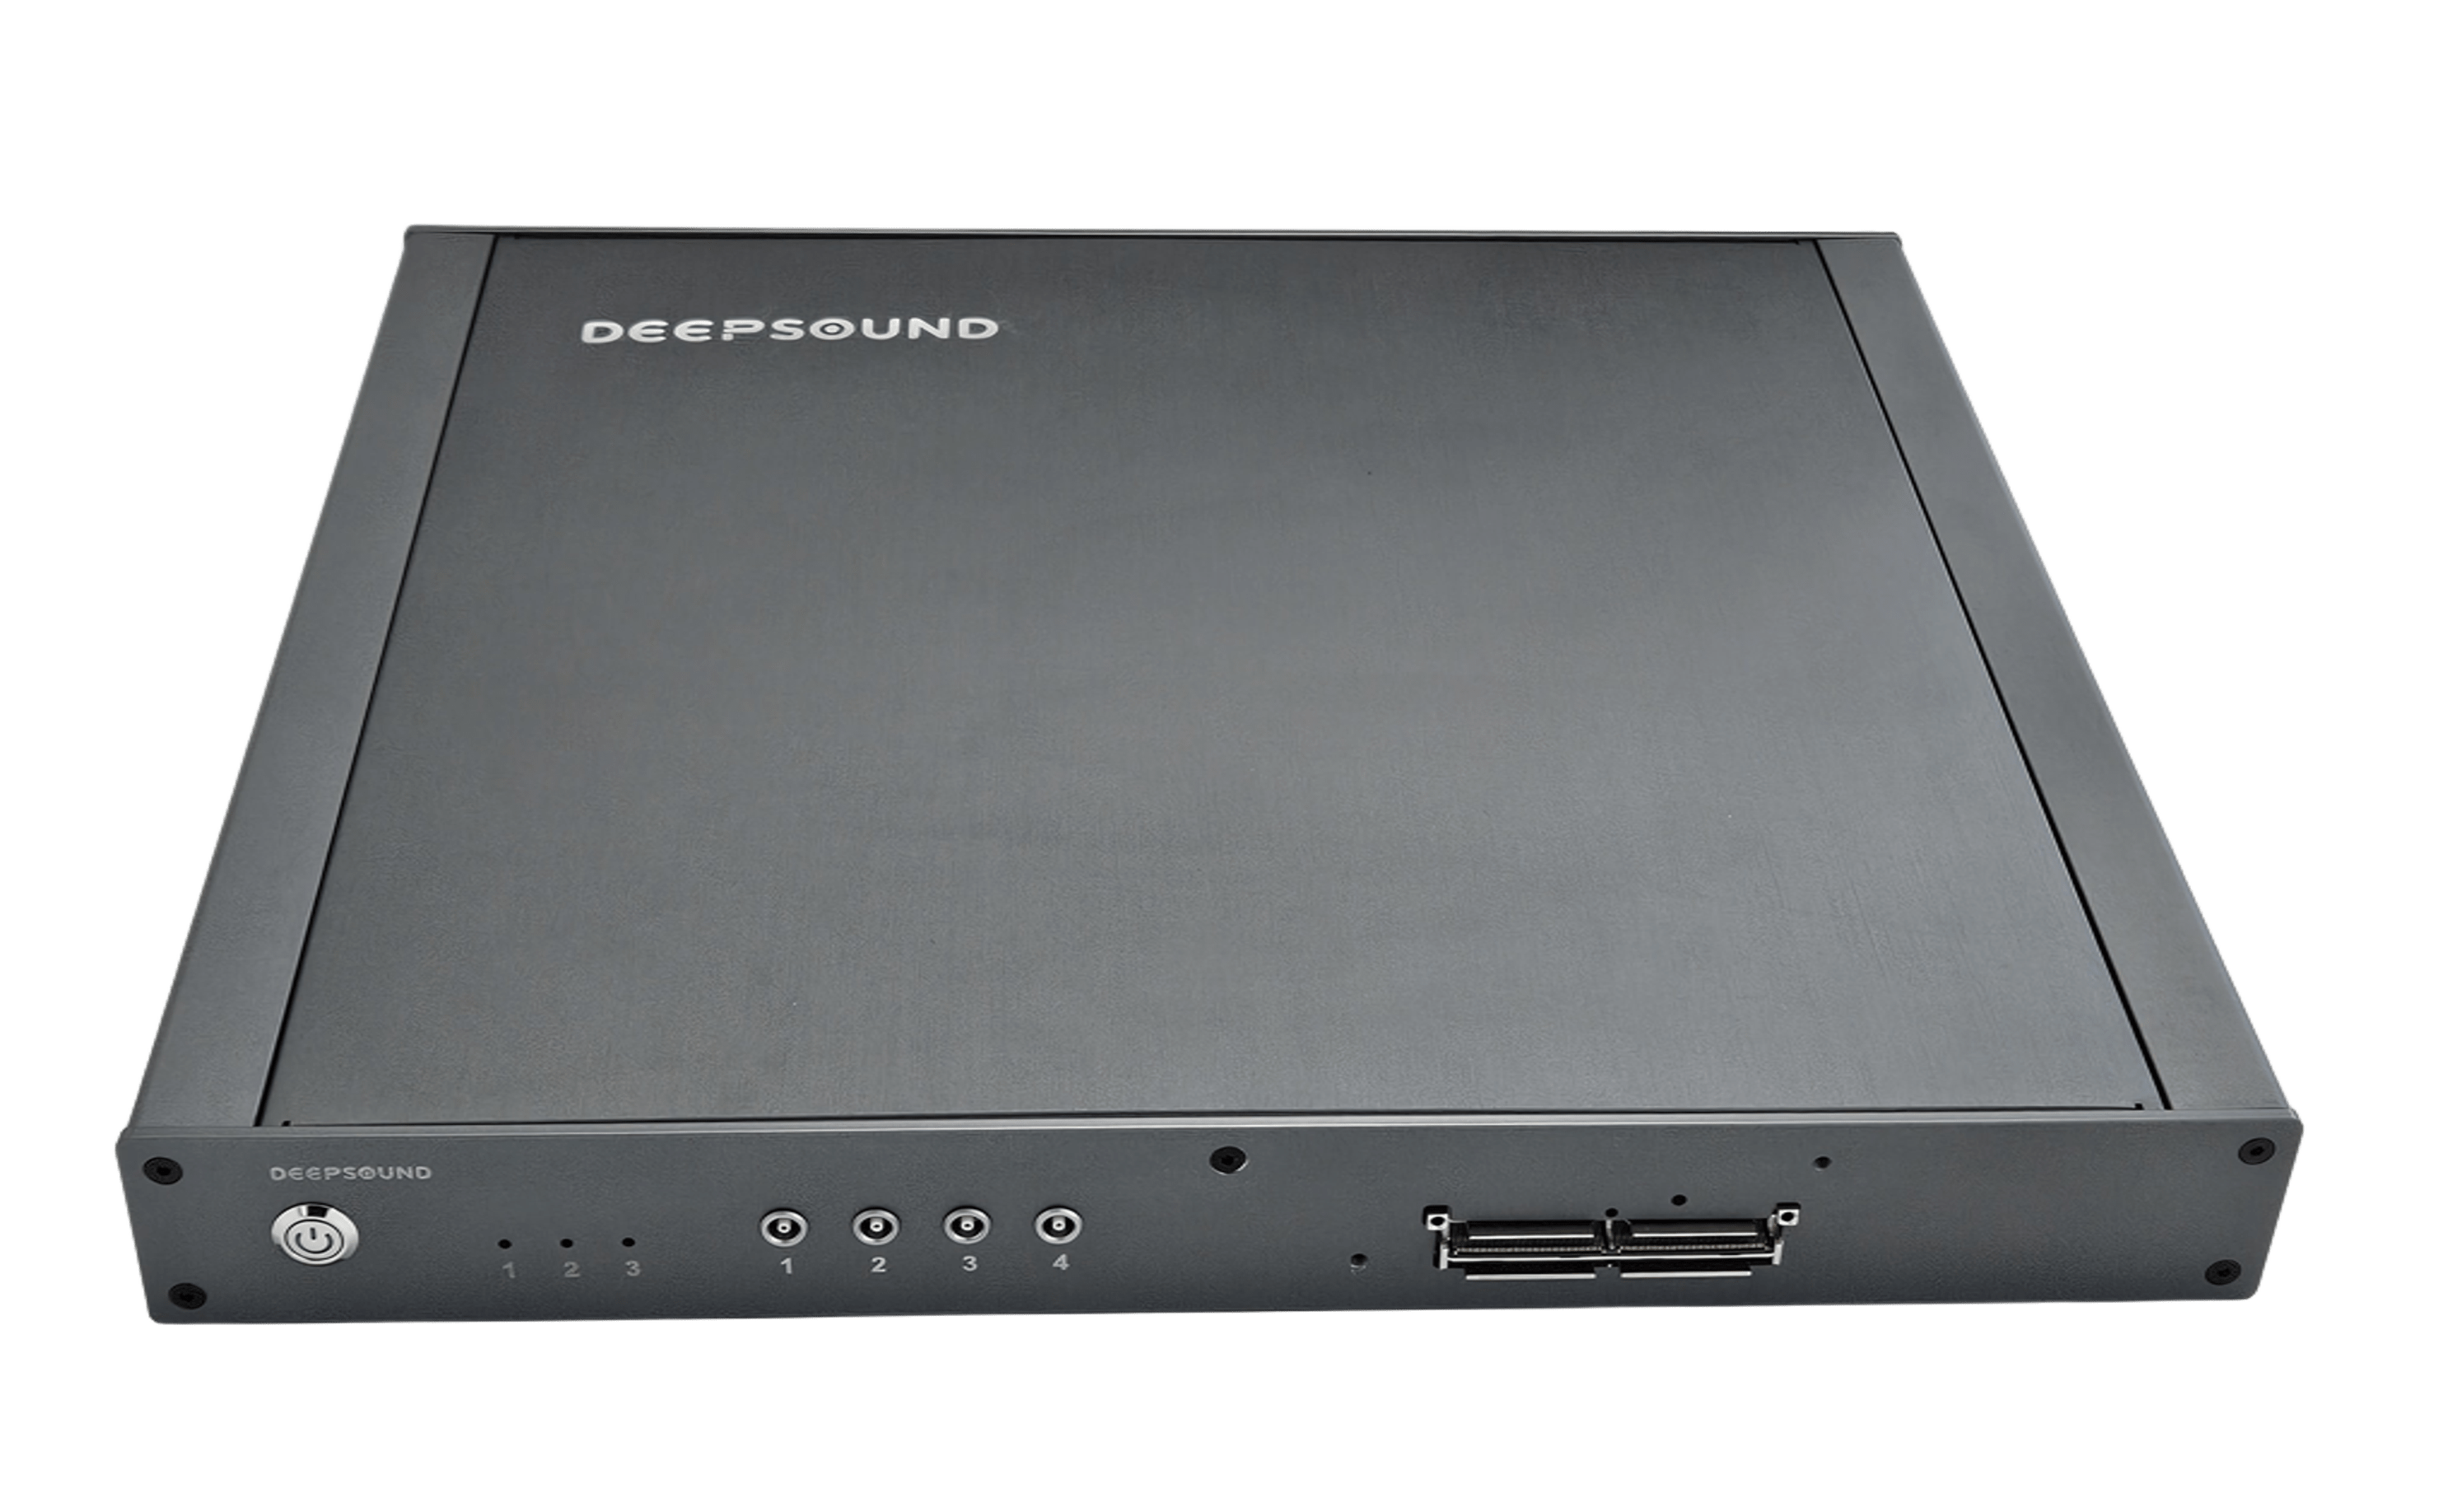
DEEPSOUND R5 Product Overview (Remote Unit with Case)
2.2 Hardware Characteristics
- Remote Control: Connects to a PC in real-time via Gigabit LAN communication to transfer large volumes of data without delay.
- Multi-channel Configuration: Simultaneously supports 32:128PR Phased Array channels and 4 independent Conventional UT channels.
- Slim Design: The 42mm ultra-slim design maximizes space efficiency when installed in confined spaces or racks.
- Expandability: Capable of responding to various automated inspection scenarios through external encoders and input/output interfaces.
PART III: Hardware Interface
3.1 Device Layout and Parts
- The R5 interface is designed around intuitive status indication and powerful connectivity.
3.1.1 Front Panel
- Power Button: A physical button that controls the device power.
- Status LEDs (1-3): Indicate the device’s power, communication, and data acquisition status.
- UT Ports (1-4): Ports for connecting up to 4 Conventional UT probes.
- PAUT Port: High-density connector for connecting a 32:128PR Phased Array probe.
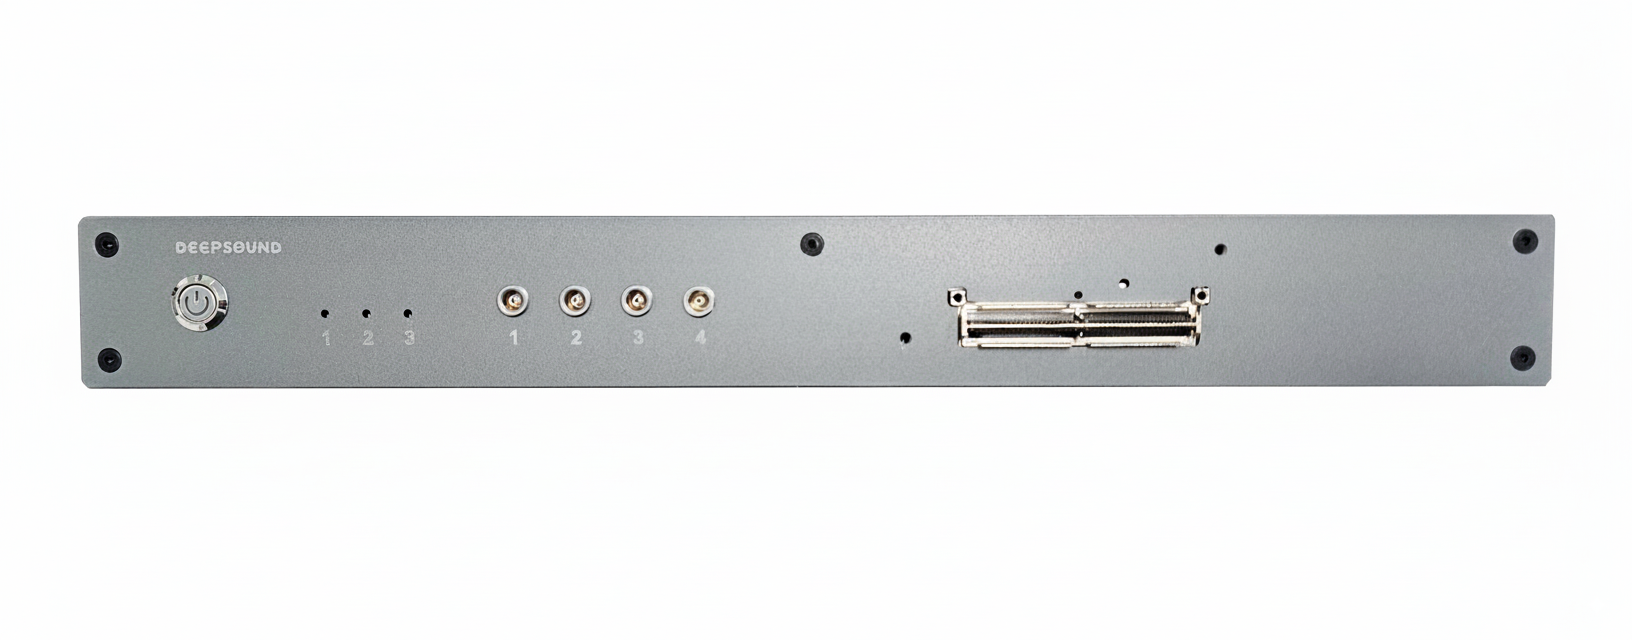
DEEPSOUND R5 Front Interface Details
3.1.2 Connectivity (Rear/Side)
- LAN Port: Gigabit Ethernet port for connecting the device to a PC.
- USB Port: USB 3.0 port for data transfer and auxiliary device connection.
- HDMI Port: Video output port for connecting an external monitor or projector.
- Power Inlet: Dedicated DC power adapter connection port.

DEEPSOUND R5 Status & Connection Indicators
PART IV: Preparation for Use
4.1 PC Connection Setup
- Network Configuration: After connecting the R5 and the control PC with a LAN cable, configure the PC’s network to the IP address range specified in the manual.
- Software Execution: Install and run the dedicated analysis software on the PC to verify the device recognition status.
4.2 Power Management
- Power Supply: Connect the dedicated DC adapter and press the power button on the front.
- Boot Verification: Check the system readiness by ensuring the front status LEDs light up correctly.
PART V: External Connections
5.1 Probe Connections
- PAUT Probe: Align the dedicated high-density connector horizontally with the PAUT port, engage it, and then secure the locking mechanism.
- UT Probe: Connect UT probes to any of the required channels from 1 to 4.
5.2 Synchronization
- Encoder Connection: When using an automated scanner, connect the encoder cable to the designated port to synchronize position data.
PART VI: Device Specifications
6.1 General Specifications
- Dimensions (WxHxD): 349 x 310 x 42 mm (With Case)
- Weight: 1.2 kg
- Power Supply: DC 12 V (External Adapter)
- PC Communication: Gigabit Ethernet (LAN)
- Video Output: HDMI x 1
6.2 Phased-Array Specifications
- PAUT Channel: 32:128PR
- Scan Type: Linear, Sectorial, Conventional, TOFD
- Focal Law: Unlimited
- Focusing Mode: True-depth, Sound path
- Channel Group: Up to 8 Groups
6.3 Acoustic & Data Specifications
- Pulser (Voltage): 25 V ~ 160 V (5 V Step)
- Pulser (Pulse Shape): Bipolar Pulse
- Pulser (Pulse Width): 50 ns ~ 2,000 ns
- Receiver (Gain Range): 0 dB ~ 90 dB
- Receiver (Band Width): 0.5 ~ 20 MHz
- Receiver (Sample Resolution): 16 bit
- A-scan Data Points: Up to 16,384 points
PART VII: Troubleshooting
7.1 Basic Troubleshooting
- Communication Error: Check the LAN cable connection and the PC’s IP configuration.
- Power Failure: Check the adapter connection status and whether the front LEDs are lit.
- Data Loss: Check the network bandwidth and software settings.
7.2 Support
- Manufacturer: SEONGSANLAB Co., Ltd.
- Contact: +82-2-2039-5725 / admin@dspaut.com